DIY Bluebird Mealworm Feeder: A Step-by-Step Guide to Building the Perfect Feeder
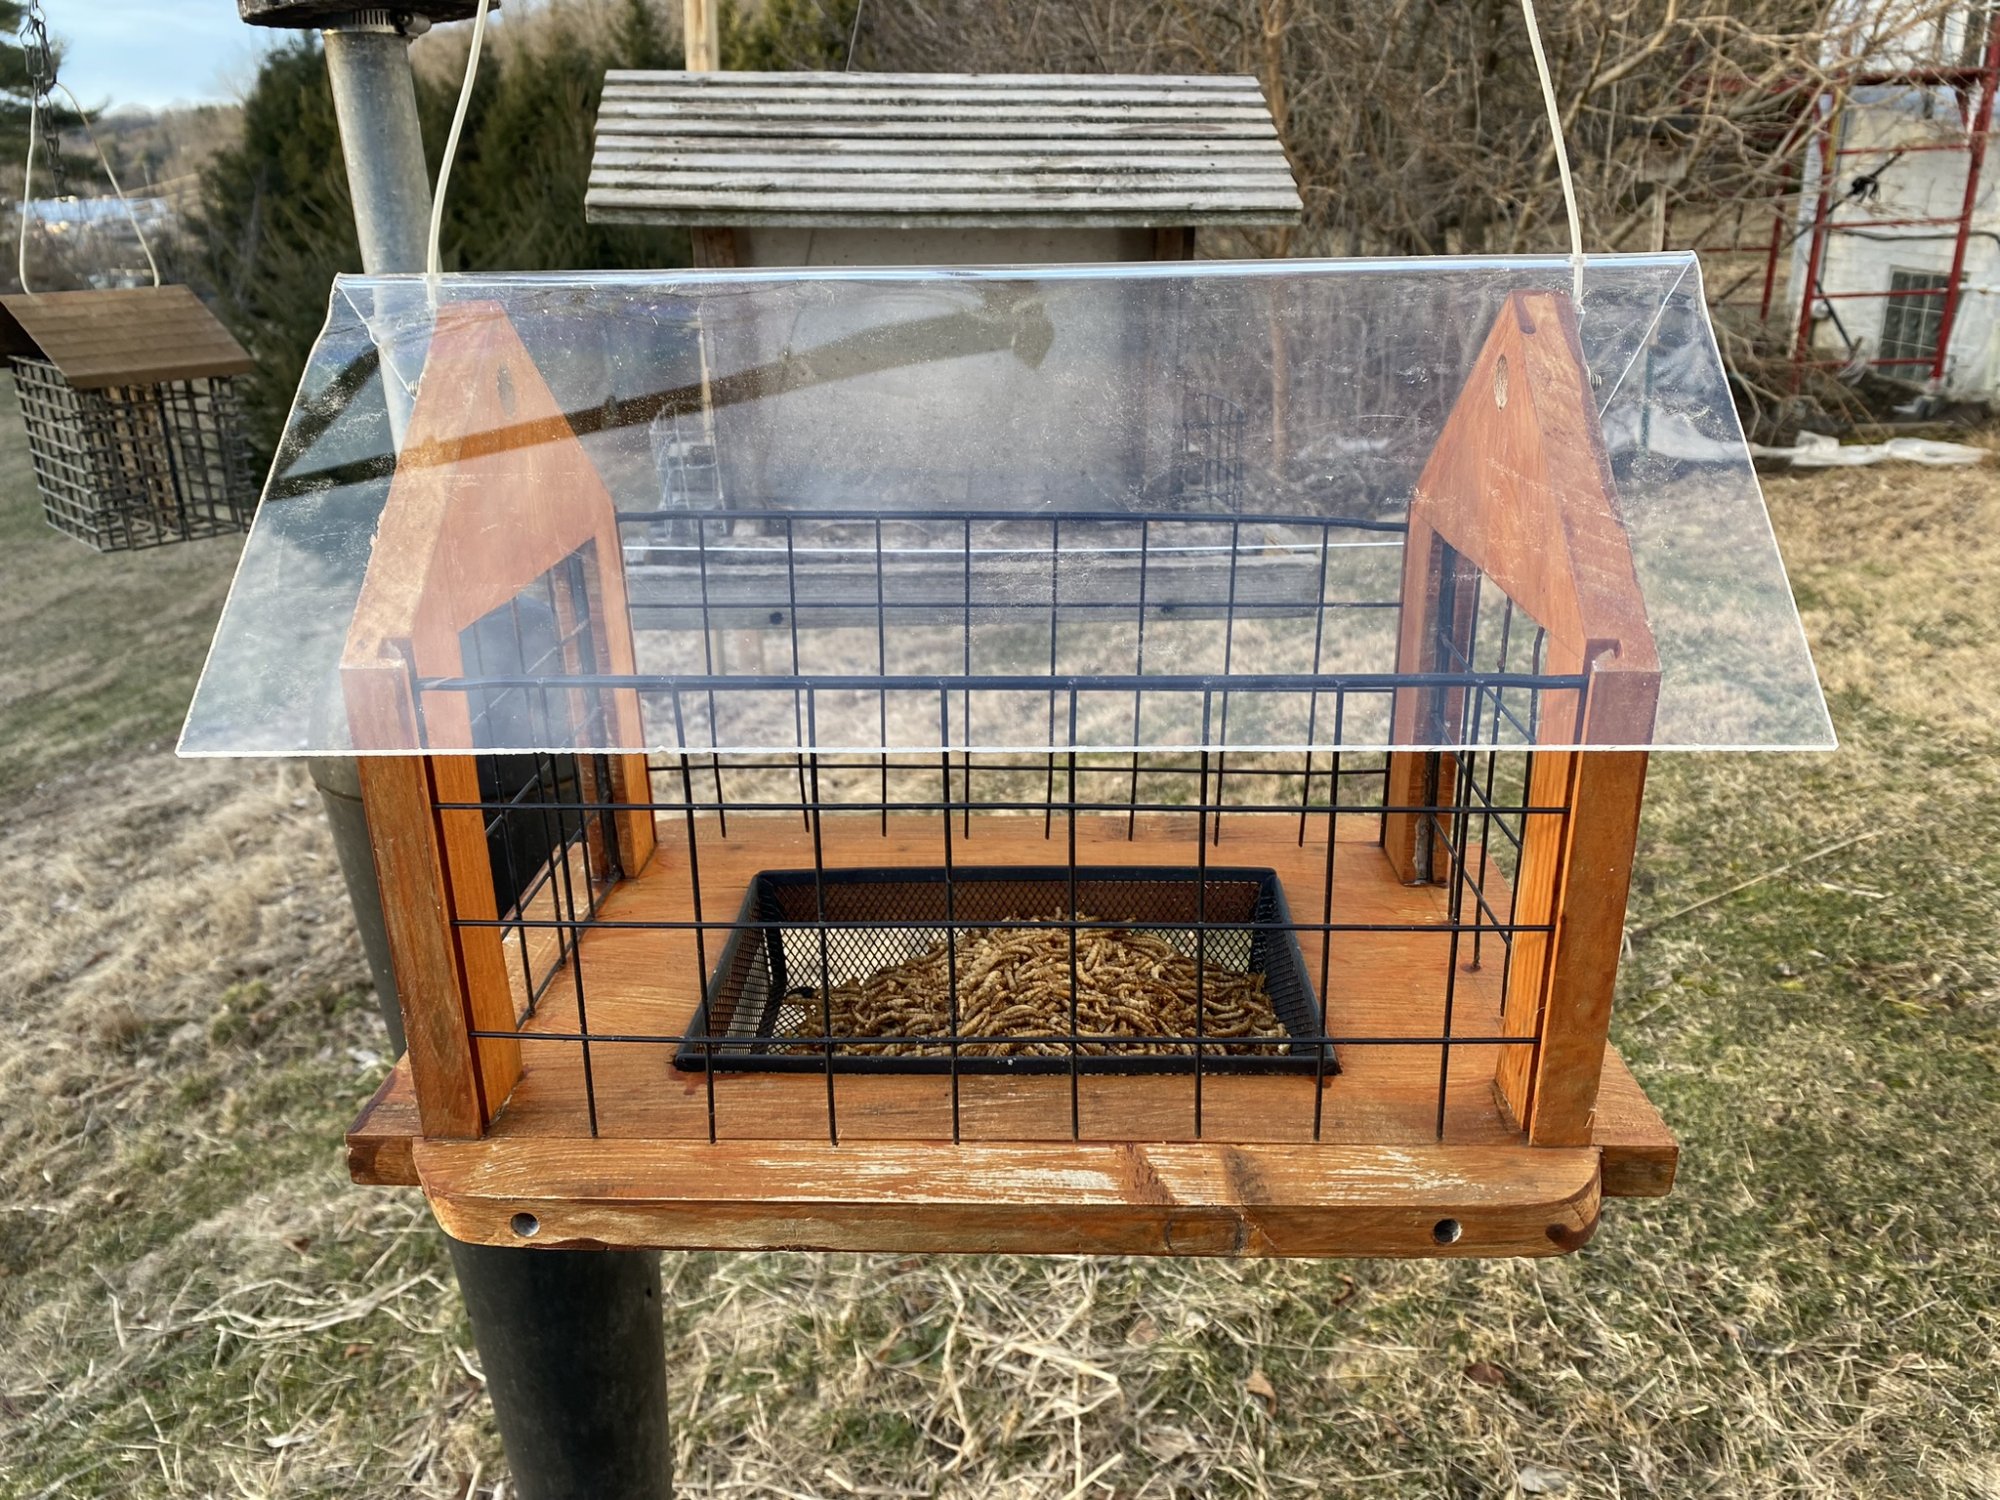
At PixCams, Inc., we’re always looking for ways to improve backyard bird feeding, and one of our latest innovations is a custom-designed bluebird mealworm feeder that solves many common problems found in commercial designs. If you’ve ever tried feeding mealworms to bluebirds, you know how challenging it can be to keep larger, more aggressive birds—like European starlings—from taking over. Our new large cage feeder is specifically designed with standard 1 ½” openings, allowing easy access for bluebirds while keeping unwanted visitors out.
One of the key features of this feeder is its four-sided entry with large landing perches, making it easy for bluebirds to land, enter, and exit without struggling—something we noticed was a major flaw in many other feeders. To create a comfortable and inviting space, we incorporated a clear plexiglass roof, allowing plenty of light inside while keeping mealworms dry. Additionally, the feeder includes a sunken mesh tray, preventing starlings from reaching in and stealing the food while still giving bluebirds full access. This feeder wasn’t just designed overnight—we carefully observed bluebirds using our early prototypes, making adjustments along the way until we perfected a design that truly works.
In this blog post, we’ll walk you through a step-by-step guide on how to build your very own bluebird mealworm feeder based on our proven design. Whether you’re an experienced DIYer or just getting started, we’ll provide clear instructions, a materials list, and helpful tips to ensure your feeder is both functional and attractive. By following this guide, you can create a feeder that gives bluebirds easy access to their favorite treat while keeping larger, more aggressive birds at bay. Let’s get started!
What You Need To Build This Feeder
1 x 10 x 6′ Pine Lumber – Note: If you can’t get 6′ lumber purchase 8′ lumber
Start with cutting two sites from the 1 x 10 lumber that are 10″ in length. Cut the roof pitch by measuring 6″ from the base on both side then drawing a line to the mid point. Cut the roof pitch along those lines as shown above.
Cut the opening for the mesh grid as shown above. Also drill the 1/4″ hole in the location shown above.
Flip both side over and cut the slot for the wire mesh grids as shown above. Also, drill a flat bottom countersink hole 1/2″ in diameter 1/4″ deep.
You now should have both sides almost completed. The last step is to add the metal mesh grid.
We used a large pair of wire cutters to cut the wire mesh grid. We used a grinder to smooth the edges after cutting. Cut (2) wire grids to 6 1/4″ x 4″ as shown above.
Cut small slots for the metal mesh to fit into the sides. These slots should be about 1/4″ wide x 1/4″ deep.
Both side are now completed and ready to add to the base.
Making The Feeder Base
Start by cutting a 17″ base from the 1 x 10 lumber as shown above. Note: the photo above shows the side perches attached.
Cut the hole for the metal mesh tray that will hold the mealworms as shown above. Tip: Use a jigsaw/saber saw to make this cutout.
Cut two side perches from a piece of the 1 x 10″ lumber that are 1 1/2″ x 15″ as shown above. Round the edges as shown above using a jigsaw/saber saw.
Drill pilot holes in the sides of the perches as shown above and attach to the base with wood screws.
Turn the base over and drill the (4) pilot holes as shown above that will be used to attach the sides using wood screws.
Attach The Sides To The Base
Attach the side as shown above. Use wood screws from the bottom to screw the sides to the base. Note: The slots cut for the wire mesh grids must point inward as shown above.
Cut two wire mesh grids for the feeder sides that are 14″ long x 6 1/2″ high.
Insert the wire mesh grids into the slots on the side as shown above.
Making The Roof
Cut a piece of 1/8″ plexiglass to 18″ x 15″. Along the 15″ size mark a line at 7 1/2″ (the middle) and draw a line as shown above.
Clamp a 2 x 4 board at the middle line drawn in the plexiglass on a work bench and have the other end hang off the side of the work bench.
Use a heat gun along the edge to soften the plexiglass. It will take a few minutes to get the plexiglass to soften. Move the heat gun side to side not keeping it in one location too long.
Place a board under the plexiglass once it is soft to support it while you start bending it upwards.
Keep the board in place for a minute for the plexiglass to cool. The result is shown above.
Place the roof on the feeder and mark the location where to drill the holes for the hanger wire to pass through.
Carefully and slowly drill a hole a little larger than the diameter than the hanger wire. If you drill too fast you can crack the plexiglass. See above.
Making The Wire Hanger
Using a flexible and heavy gauge wire that you can pick up from your local hardware store or home improvement store cut this to a length of 48″ and bend into two equal halves as shown above.
Using an Aluminum Clip Crimp Loop connector that fits the wire diameter feed the connector in from the end until you have a loop at the top as shown above.
Crimp the Aluminum Clip Crimp Loop connector into place as shown above.
Now, take the hanger wire and feed both ends through the holes you drilled in the plexiglass roof top as shown above.
Add a Aluminum Clip Crimp Loop connector to the end of each wire and loop the wire around as shown above to create a loop at the end. Crimp into place.
Add The Roof To The Feeder
Insert a 1″ x 1/4-20″ bolt from the inside of the top side as shown above. Once the bolt is inserted place the hanger loop end over the bolt, add a 1/4″ washer then add a 1/4-20″ nut and tighten the nut down.
The final step in completing your bluebird mealworm feeder is to insert the metal mesh tray into the bottom of the feeder as shown above.
Congratulations! You have completed your feeder! It’s ready to hang outside!
Putting Up The Bluebird Mealworm Feeder
Once you have put up the bluebird mealworm feeder filling the feeder with mealworms is simple. Just lift one end of the roof as shown above and add a cup of mealworms to the tray.


Would love this if you could take orders for it and possibly make it in polywood.
I have no woodworking skills or the equipment to make such an item.
Can Carolina Wrens fit into it too?
Yes, and they use it often too.
Amazing feeder with fantastic tutorial! Thank you so much!