How To Make A Bluebird Nest Box with LIVE Streaming Camera
DIY Bluebird Nest Box Construction: A Step-by-Step Guide
If you’ve ever wanted to attract beautiful bluebirds to your yard, building a nest box is one of the best ways to do it! This easy step-by-step guide will walk you through how to construct a simple yet effective bluebird nest box in just a few hours. With spring nesting season just around the corner, now is the perfect time to prepare a safe and welcoming space for bluebirds and other cavity-nesting songbirds.
While bluebirds are the primary target for this nest box, they aren’t the only ones that might call it home! Other backyard favorites like titmice, tree swallows, chickadees, and wrens also seek out these cozy cavities for nesting. Providing a well-built box in the right location can help support local bird populations, giving them a safe place to raise their young while offering you the chance to observe nature up close.
While this guide includes instructions for installing a live streaming camera, you don’t have to use one if you simply want to build a traditional bluebird nest box. These plans will work perfectly for anyone looking to provide a safe nesting space for bluebirds and other cavity-nesting songbirds. The only modification in these plans is that the box is slightly taller than a standard bluebird nest box to accommodate the camera. However, this extra height won’t affect its functionality if you choose to forgo the camera—your bluebird box will still provide an excellent home for nesting birds!
But why stop at just building the box? This guide will also cover how to install a live streaming camera inside the nest box, so you can watch all the nesting action unfold in real-time. Imagine witnessing the moment eggs hatch or parents feeding their hungry chicks—all from the comfort of your home! Plus, with the PixCams EZ Streamer-Pi, you can easily live stream the footage directly to YouTube, allowing you to share this incredible experience with friends, family, or even a broader online community.
Let’s dive in and get started on building your own bluebird nest box with a live streaming camera!
What You Need To Build The Nest Box
- 1 x 6 x 6′ Pine Lumber – Note: If you can’t get 6′ lumber purchase 8′ lumber
- Box of #8 x 1 1/2″ outdoor rated wood screws
- Roofing Material
Cutting the Wood for Your Nest Box
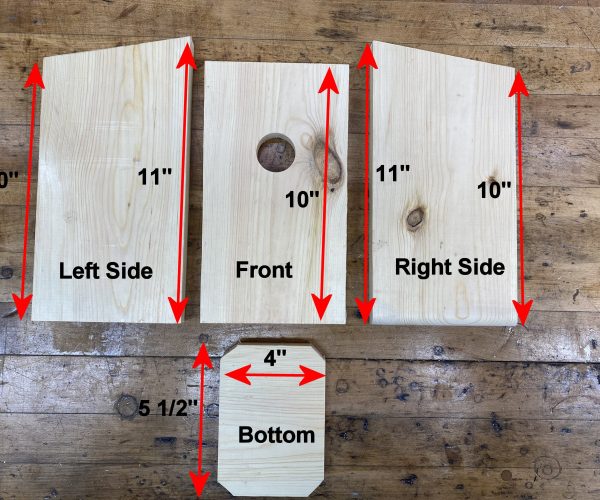
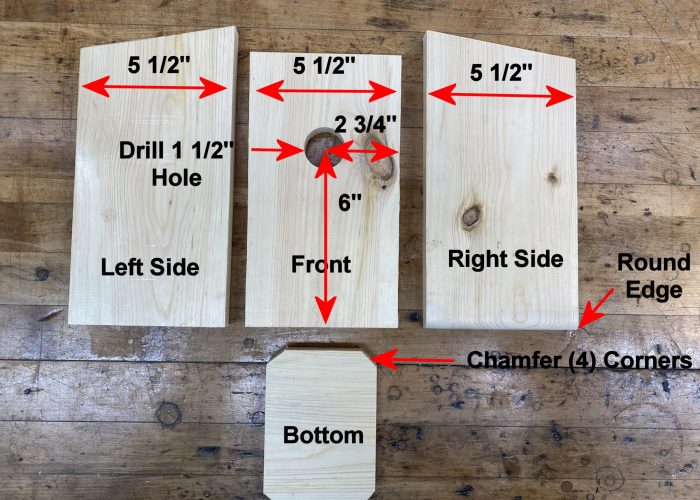
Cut the Right Side, Left Side, Front, and Bottom as shown above from the 1 x 6 lumber. We use pine lumber for this project but feel free to use your favorite type of wood for you nest box.
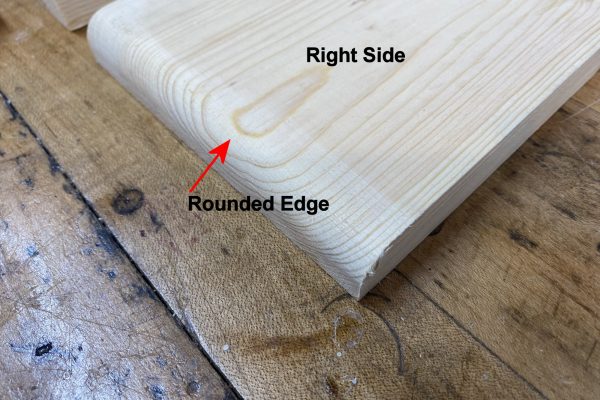
Above shows a closer detail of the rounded bottom edge of the Right Side. This is needed because this nest box opens from the right side.
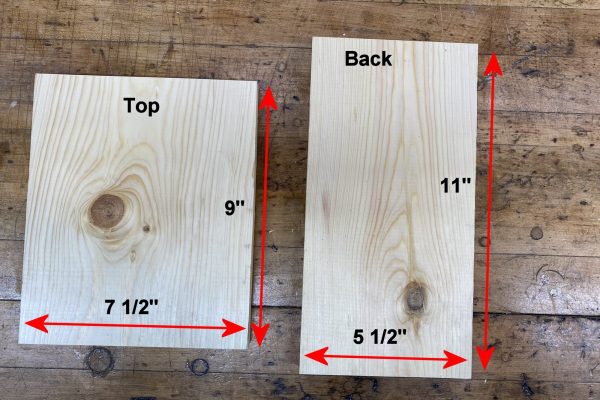
Cut the top from a 1 x 8 piece of lumber and the back from a 1 x 6 piece of lumber. Note, feel free to use 1 x 6 lumber for the top. We use a larger top to keep the rain off the box better and keep it cooler.
Drilling Pilot Holes and Assembling the Nest Box
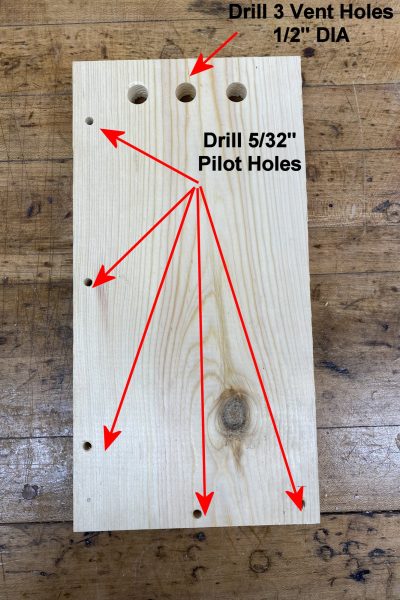
Drill ventilation holes at the top of the Back as shown above. Drill three 1/2″ diameter holes. Also drill the pilot holes for the #8 – 1 1/2″ wood screws for box assembly. Use 1 5/32″ bit for drilling all pilot holes for this project.
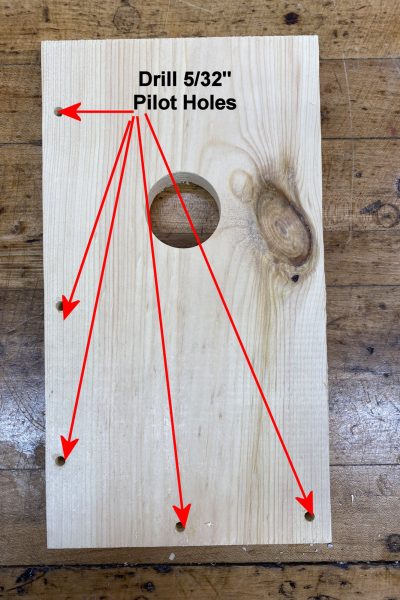
Drill the pilot holes on the Front piece as shown above.
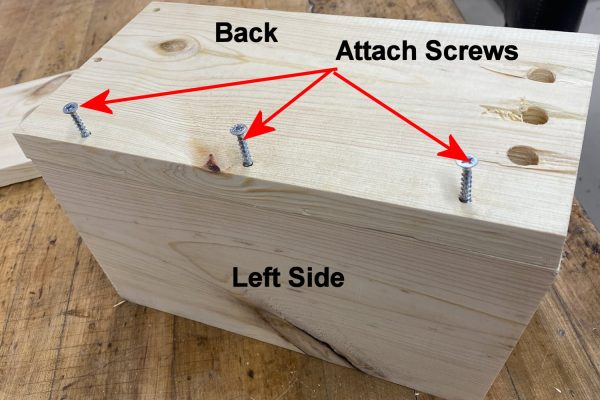
Start the assembly process by screwing the back on to the Right Side and Left Side pieces. Stand up the Right Side and Left Side as shown above and screw in the Left Side.
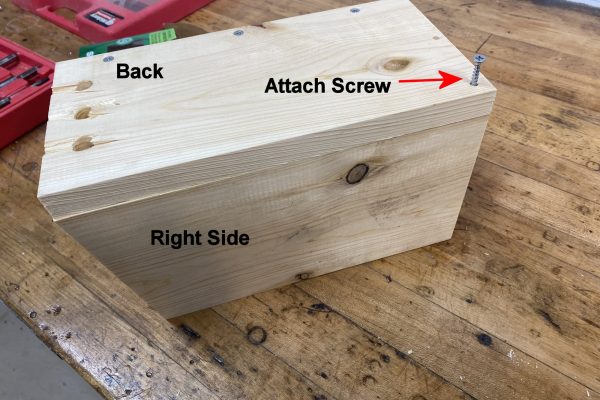
Next, screw in the Right Site. Note, only one screw is used since this is the hinge pivot point to open the nest box.
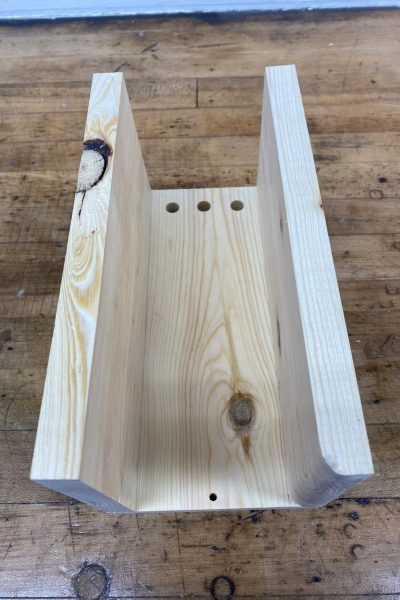
Turn the box over on the Back as shown above.
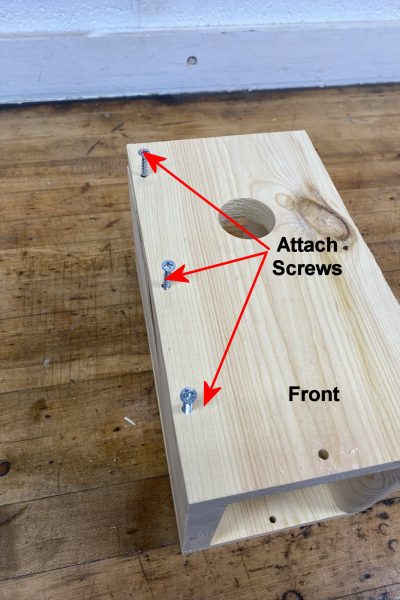
Place the Front on the box as shown above and screw in the Left Side piece.
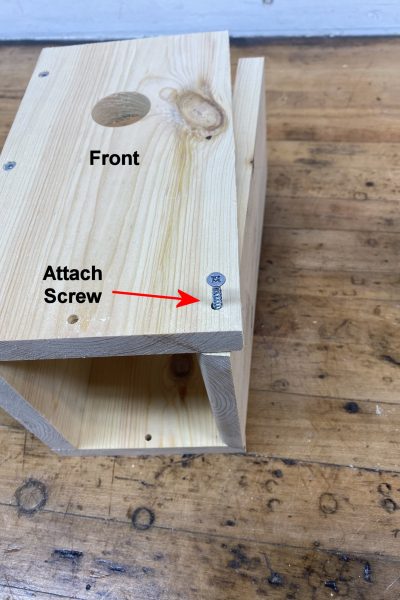
Screw in the Right Side piece as shown above.
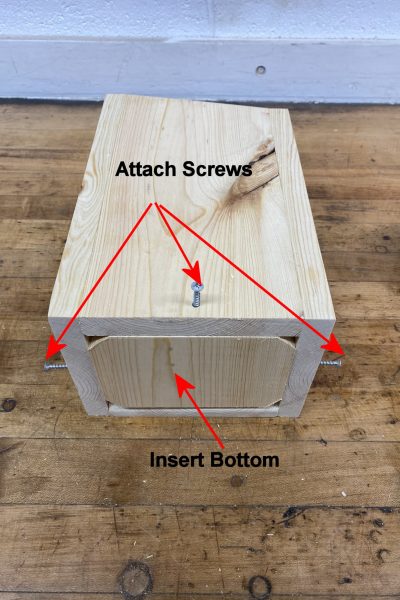
Insert the Bottom as shown above and screw into place.
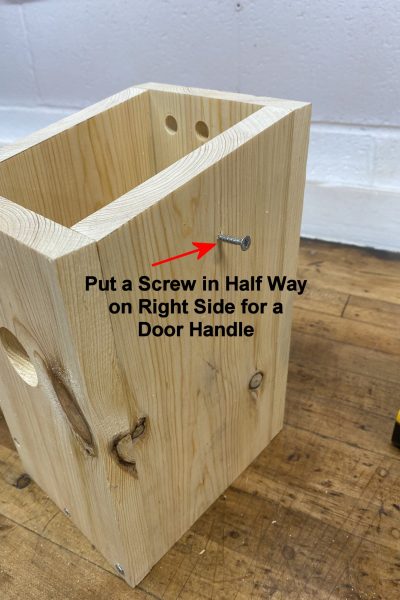
Put a screw in half way on the Right Side panel that will be used to pull the Right Side open and to close it.
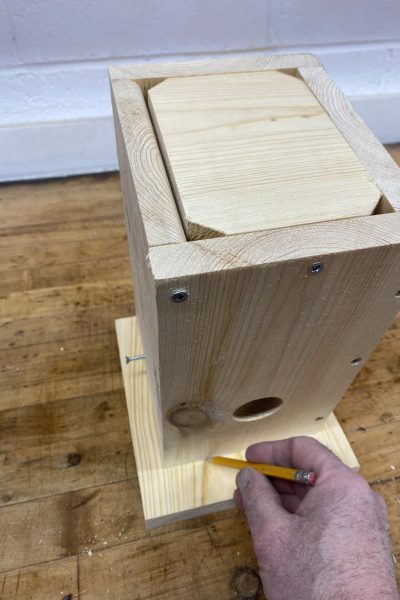
Place the roof on your work table and place the nest box on top of the roof. The nest box will be upside down as shown above. Trace the outline of the nest box on to the roof.
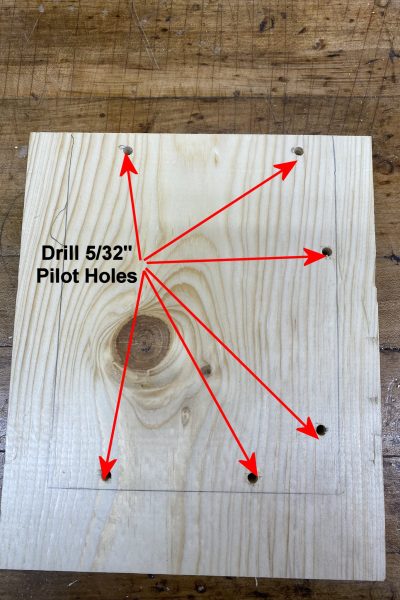
Remove the nest box and drill the pilot holes in the roof as shown above.
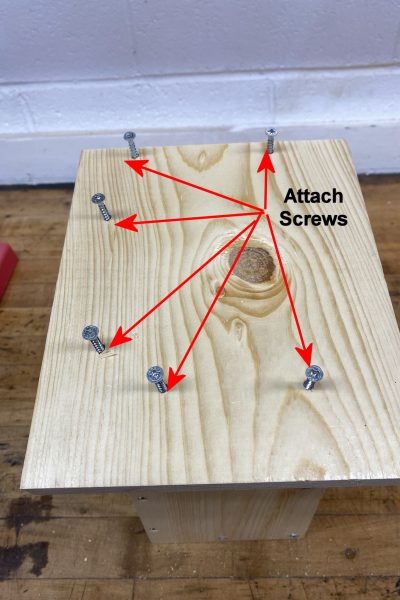
Next, put the roof with drilled pilot holes on top of the nest box and screw the roof to the nest box as shown above.
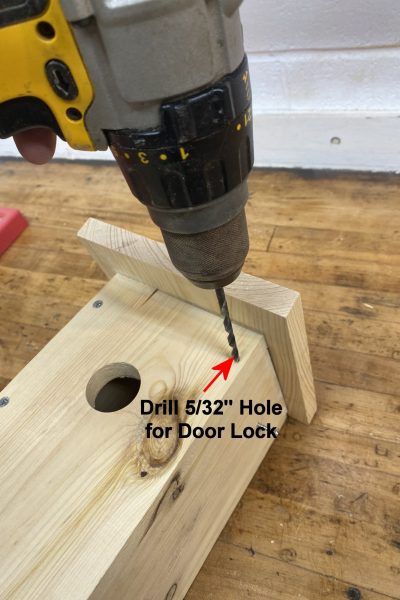
The final step in the assembly process is to add the door lock. Drill a hole in the front that goes into the Right Side about 4″ deep.
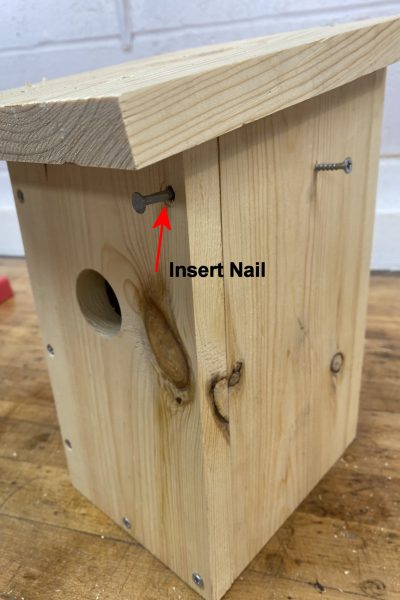
Insert a nail into the hole to keep the door closed when in use.
How To Install A Camera
Note: this section is optional. If you wish to install a live streaming camera in your nest box this is one that we recommend. This camera is an IP type camera that will connect to your home network. These cameras can be used 24/7 to watch your nest box and can be live streamed to YouTube using the PixCams EZ Streamer-Pi encoder.
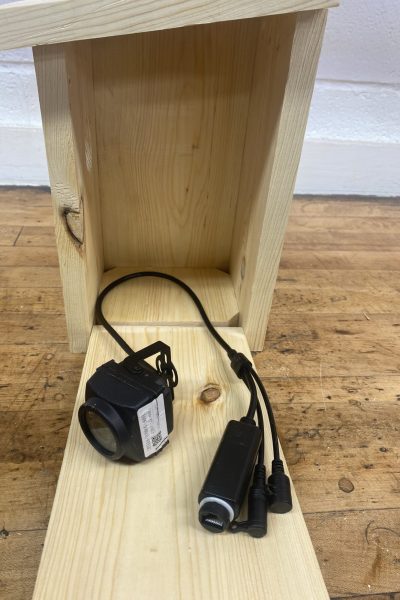
Camera Recommendations
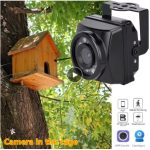
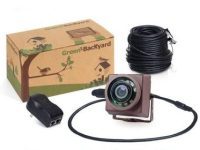
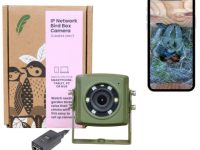
Shown above is the type of camera we recommend using. These are what are known at PoE (Power Over Ethernet) cameras. This means the camera is powered and connected to your home network through a single Ethernet cable. These are some locations you can purchase this camera:
Outdoor Mini IP PoE Camera: AliExpress Link: https://www.aliexpress.us/item/3256802313659249.html, Price $36.11
Bird Box Camera from Green-Backyard, Link: https://green-backyard.com/collections/bird-box-camera/products/outdoor-poe-wired-ip-bird-box-camera/, Price $123.50
Wired Network Bird Box Camera from Green-Feathers, Link: https://www.green-feathers.co.uk/collections/bird-box-cameras/products/wired-network-bird-box-wildlife-hd-camera-poe-version, Price $145
Camera Installation
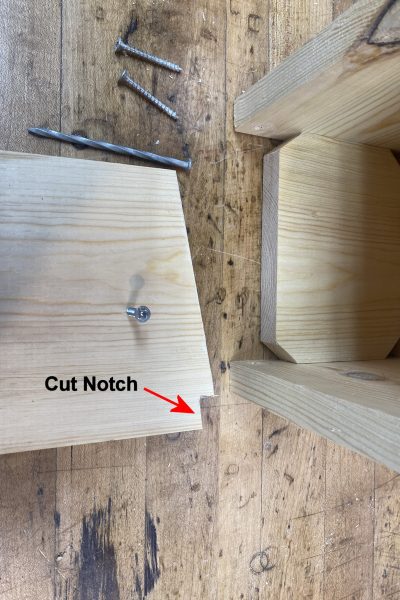
If you plan to install a camera of this type in your nest box you will need to cut a notch in the top corner of the Right Side to allow the camera cable to be fed out of the box as shown above.
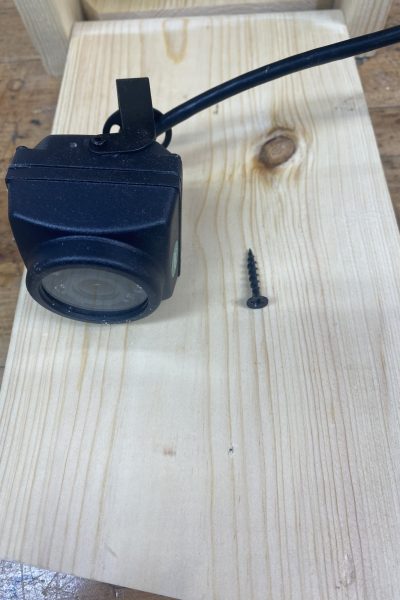
For mounting the camera in the nest box we recommend using a 3/4″ long wood screw as shown above.
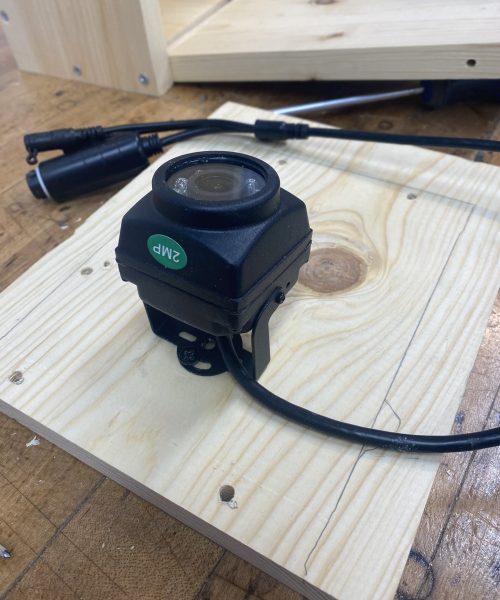
To easily mount the camera to the inside of the roof it might be easier to remove the roof and attach the camera as shown above.
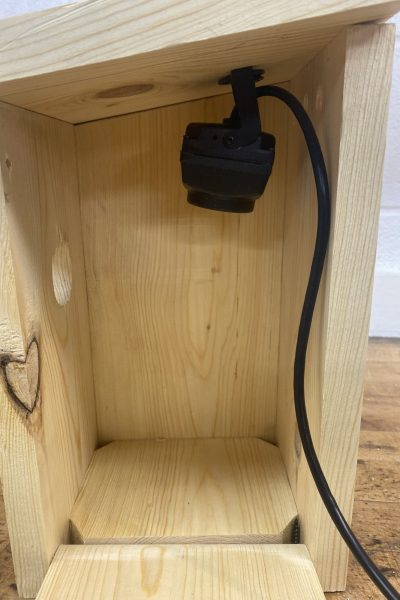
Above shows the IP camera mounted in the nest box.
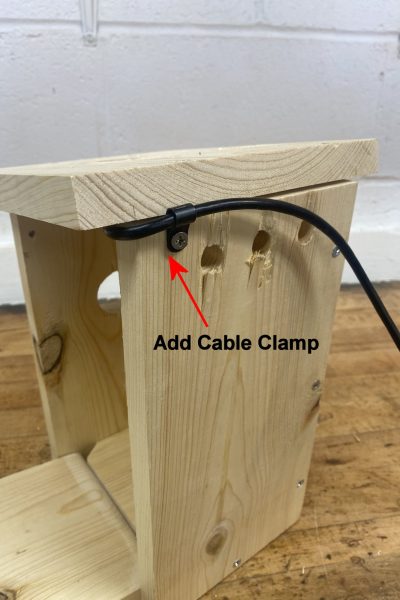
Add a cable clamp to hold the camera cable in place as show above.
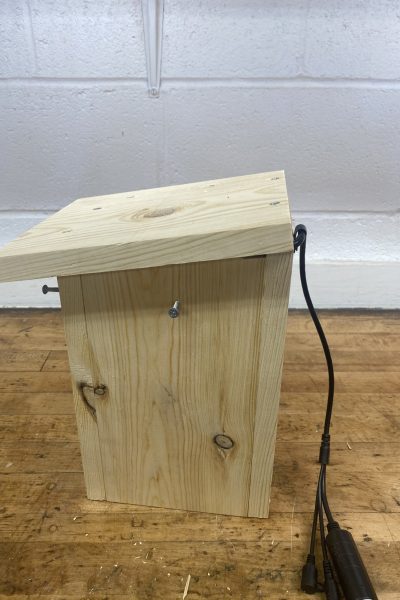
Camera installation is complete.
Adding Waterproofing To Your Nest Box
These are some steps we recommend when using pine lumber to keep your nest box in the field longer. Some people like to keep the nest box natural, but our experience has shown pine boxes that do not have a protective stain only last about 5 years in the outdoors.
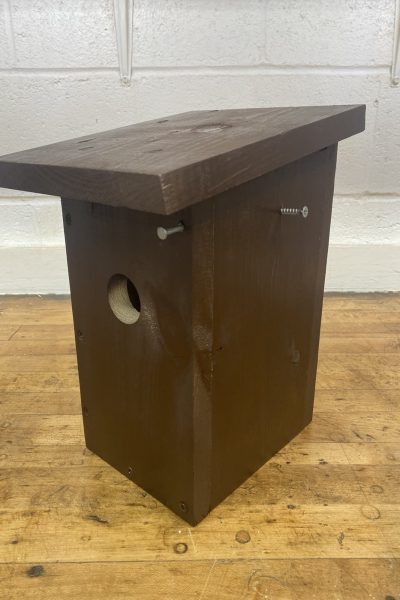
Above the nest box is coated with a waterproof stain the keep the pine lumber protected in the outdoors.
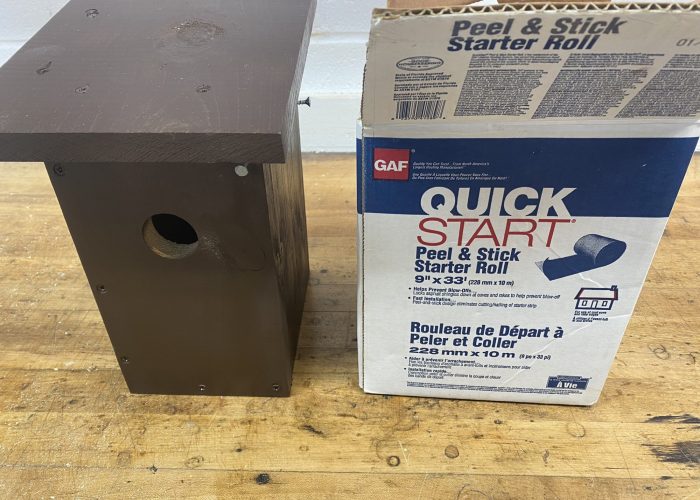
We highly recommend using a roofing product to protect the top of the nest box. Above we are using a Peel & Stick Roofing Starter.
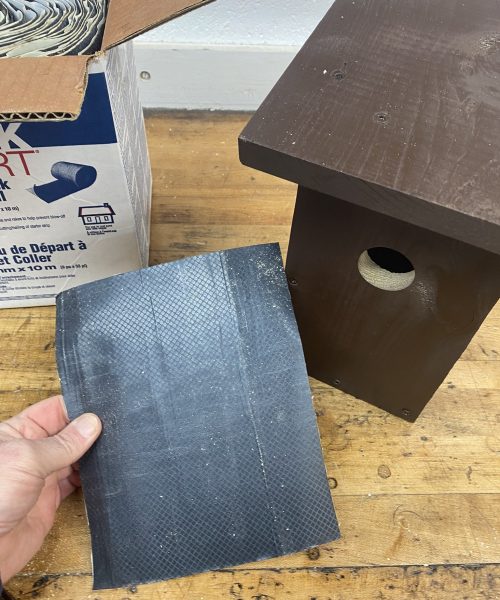
Cut the roofing piece the to fit the roof.
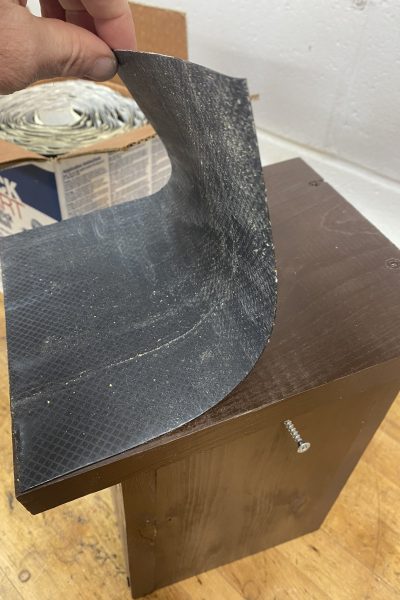
Peel and Stick the roofing piece into place as shown above.
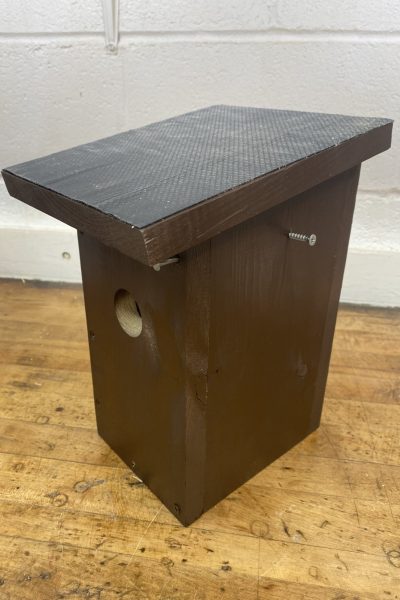
Your nest box is complete!
How To Live Stream Your Nest Box Camera To YouTube
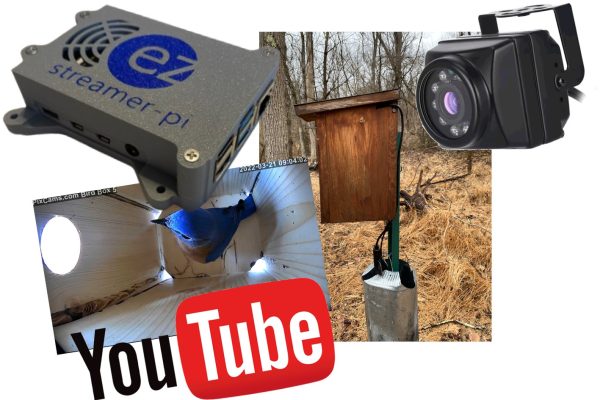
If you’ve set up a nest box camera and want to share the incredible moments of nesting birds with the world, the PixCams EZ Streamer-Pi makes live streaming easier than ever. This powerful yet user-friendly software runs on a Raspberry Pi and allows you to stream up to four IP or security cameras directly to YouTube or other platforms. With EZ Streamer-Pi, you can broadcast high-quality live footage of bird activity in real time, whether it’s a chick hatching or a parent feeding its young. Setting up is simple—just follow the EZ Streamer-Pi guide to install the software, configure your camera settings, and go live! Plus, you can check out real-world EZ Streamer-Pi live configurations to see how others are using it for their wildlife streams. Whether you’re a birdwatcher, researcher, or nature enthusiast, EZ Streamer-Pi brings the beauty of nature to viewers worldwide.
About EZ Streamer-Pi
EZ Streamer-Pi is a dedicated live streaming video encoder designed by PixCams, Inc. Our FREE EZ Streamer-Pi Softwareto create your own live stream! The EZ Streamer-Pi works with most Security/IP Cameras and will live stream to services like YouTube, Facebook LIVE, and Twitch. We also have read-built units you can purchase.
Connecting Your Camera and EZ Streamer-Pi To Your Home Network
The EZ Streamer-Pi is compatible with IP Cameras (Internet Protocol Cameras) that support H.264 and H.265 encoding and include the Real-Time Streaming Protocol (RTSP). IP cameras use either Ethernet cables or a Wi-Fi connection to connect to your local network. From there, the signal will be encoded by the EZ Streamer encoder to your live streaming service.
Below are several different diagrams of how IP cameras can be connected to a network to be live streamed. The EZ Streamer can stream any combination of the configurations shown.
Configuration 1

This is one of the most basic set ups using the EZ Streamer-Pi and a security/IP Camera to live stream your webcam to YouTube and/or Facebook Live. Simply connect the EZ Streamer to your router or a network switch on your network. Next, run an outdoor rated CAT6 Ethernet cable from your router or switch to the IP camera. You will also need to power the IP camera using this configuration. The Ethernet cable can’t be any longer than 300′. Once the systems are wired configure then set up a live stream on your EZ-Streamer unit and you’re live!
Configuration 2

This is second most basic set up’s using the EZ Streamer-Pi and a WiFi security/IP Camera to live stream your webcam to YouTube and/or Facebook Live. First, connect the EZ Streamer to your WiFi router or network switch. Next, install our WiFi IP camera within wireless range of your WiFi router and plug the AC power outlet into your camera. Once the systems is wired configure your EZ Streamer-Pi then set up a live stream on your EZ-Streamer unit and you’re live!
Configuration 3
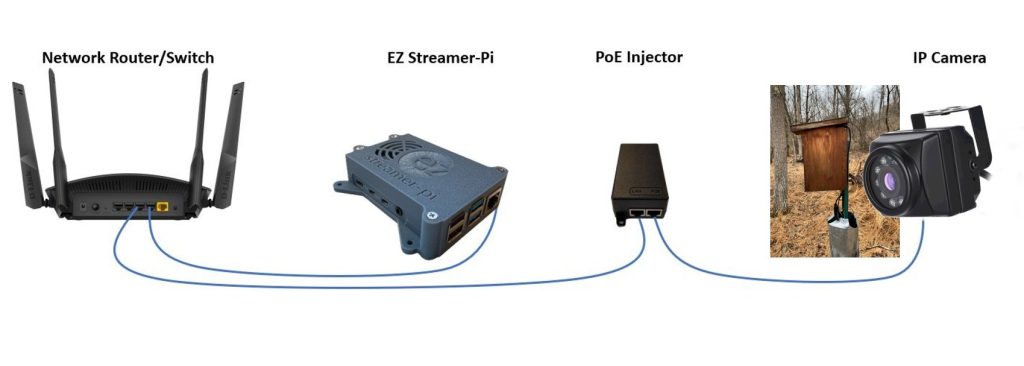
Configuration 3 demonstrates the use of a PoE injector. If your IP camera supports PoE (Power over Ethernet) you can use a PoE extender to extend the wired range of your IP camera up to 100 meters/300 feet from the network router/switch. Using a PoE injector means that both network communications and power are run over the ethernet cable that will also power the IP camera which eliminates the need to power the IP camera. This configuration is useful for IP cameras mounted outdoors
Configure The EZ Streamer-Pi To Live Stream To YouTube
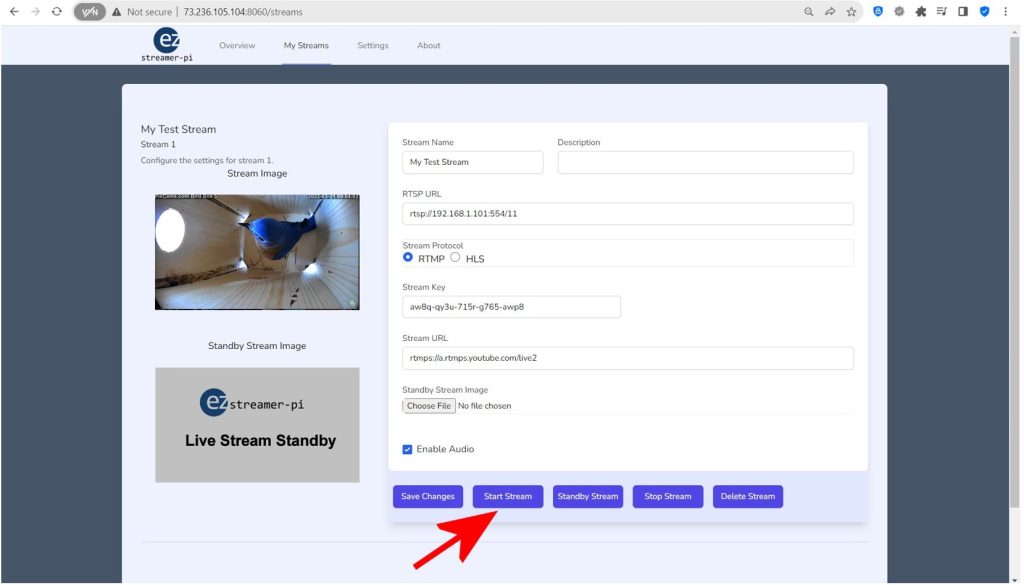
EZ Streamer-Pi is a dedicated RTSP live streaming encoder using a Raspberry Pi single board computer. Connect any IP camera with H.264 or H.265 compression and supports RTSP protocol (Real-Time Messaging Protocol). Stream to any streaming player service supporting RTMP (Real-Time Messaging Protocol) such as YouTube, Facebook Live, and Twitch.
Enter a name and a description of your new live stream. Next, enter the stream URL into the “RTSP URL” box of your IP camera. This will start with “rtsp://”. The format of the RTSP link is typically provided by the IP Camera manufacturer. You can also visit https://www.ispyconnect.com/cameras for help finding the RTSP link of your IP camera.
Example Camera RTSP Link Format
This is a common format for the RTSP Stream URL, but each camera typically has its own format:
rtsp://username:password@IP Address:RTSP Port/stream0
Example of a camera with the IP address of 10.1.10.133 on RTSP Port 554 with the username “admin” and password “mycampassword”:
rtsp://admin: mycampassword @10.1.10.133:554/stream0
NOTE: In the camera settings please set the streaming protocol to H.264, enable the audio, and set the bitrate lower than 4,000 bits/second. Be sure to set a static IP address for each camera so this will be consistent for the RTSP link of your EZ Streamer-Pi. If you plan to use H.265 format then you will need to stream to YouTube’s HLS player.
Start The YouTube Live Stream
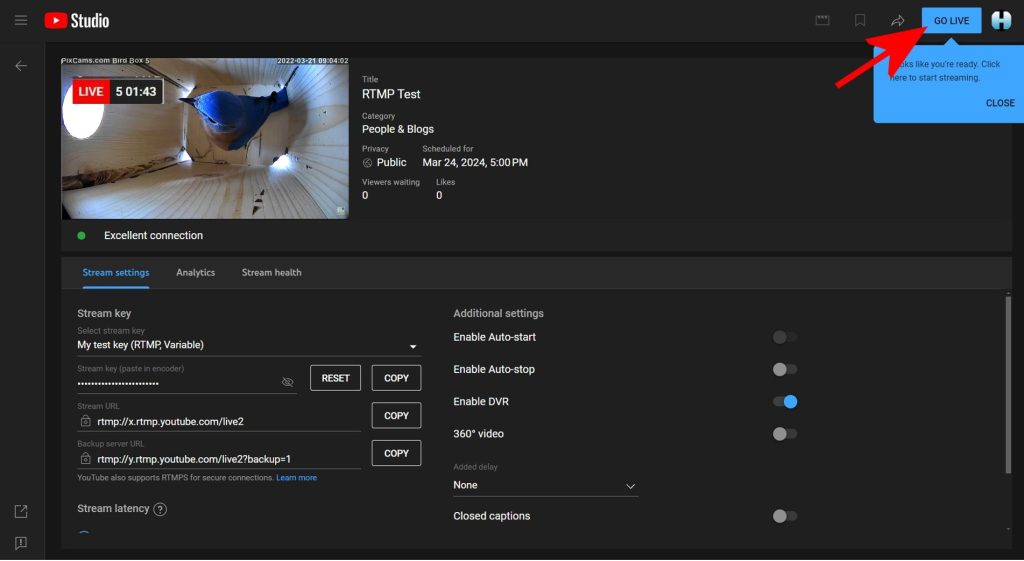
First, go to your YouTube channel. If you do not have a YouTube account, you will need to create one first. After you log into your YouTube channel press the “Customize channel” button. Next, press the “CREATE” button. Select the “Go Live” option. Next, press the “SCHEDULE STREAM” button. Enter the Stream Details of the Title and Description, once complete press the “NEXT” button. Enter the Stream Customization details and press the “NEXT” button when complete. Once complete you need to copy the “Stream Key” and “Stream URL” and past those into your EZ Streamer-Pi Stream Key and Stream URL. Go back to your YouTube page and you should see the stream appear. This can take several minutes. Once the stream is established the “GO LIVE” button will turn blue. When this happens press that button.
Congratulations! You have successfully started your first YouTube Live Stream! If you go to the “Overview” button on your EZ Streamer-Pi browser page you will see a display showing the frame rate (FPS) and bitrate of your live stream. this data will be graphed ever one-minute on the graphs below to monitor the stream health of your live stream.

