How To Make An Owl Box With LIVE Streaming Camera

How To Make An Owl Box with LIVE Streaming Camera

 DIY Owl Box Construction: A Step-by-Step Guide

Why Install a Screech Owl Box?

Adding a screech owl box to your backyard is a fantastic way to support local wildlife while gaining the opportunity to observe one of nature’s most fascinating nocturnal hunters up close. Screech owls are small but fierce predators that help control rodent and insect populations, making them a natural form of pest control. Unlike songbirds, which primarily use nest boxes in the spring for breeding, screech owls utilize nest boxes year-round—not only for nesting but also as winter roosts. This means that by installing an owl box, you increase your chances of seeing these incredible birds throughout the year, especially during the colder months when they seek shelter from harsh weather.

When and Where to Install a Screech Owl Box

The best time to install a screech owl box is in the fall or winter, well before the breeding season begins in early spring. Owls begin scouting for potential nesting sites long before they lay eggs, and providing a box early increases the likelihood of attracting a resident owl. However, even if you install a box later in the season, it can still be used as a winter roost and may be claimed as a nesting site in future years.

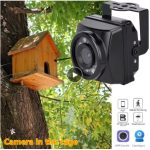
Placement is key to successfully attracting screech owls. The box should be mounted at least 10 to 15 feet off the ground on a sturdy tree, pole, or building. It should face away from prevailing winds and receive partial shade to prevent overheating in the summer months. Positioning the box near open woodland, meadows, or fields will make it more attractive to owls, as these areas provide ample hunting opportunities. Avoid placing the box too close to human activity, as screech owls prefer quieter locations with minimal disturbance.

Bringing Your Owl Box to Life with a Live Streaming Camera

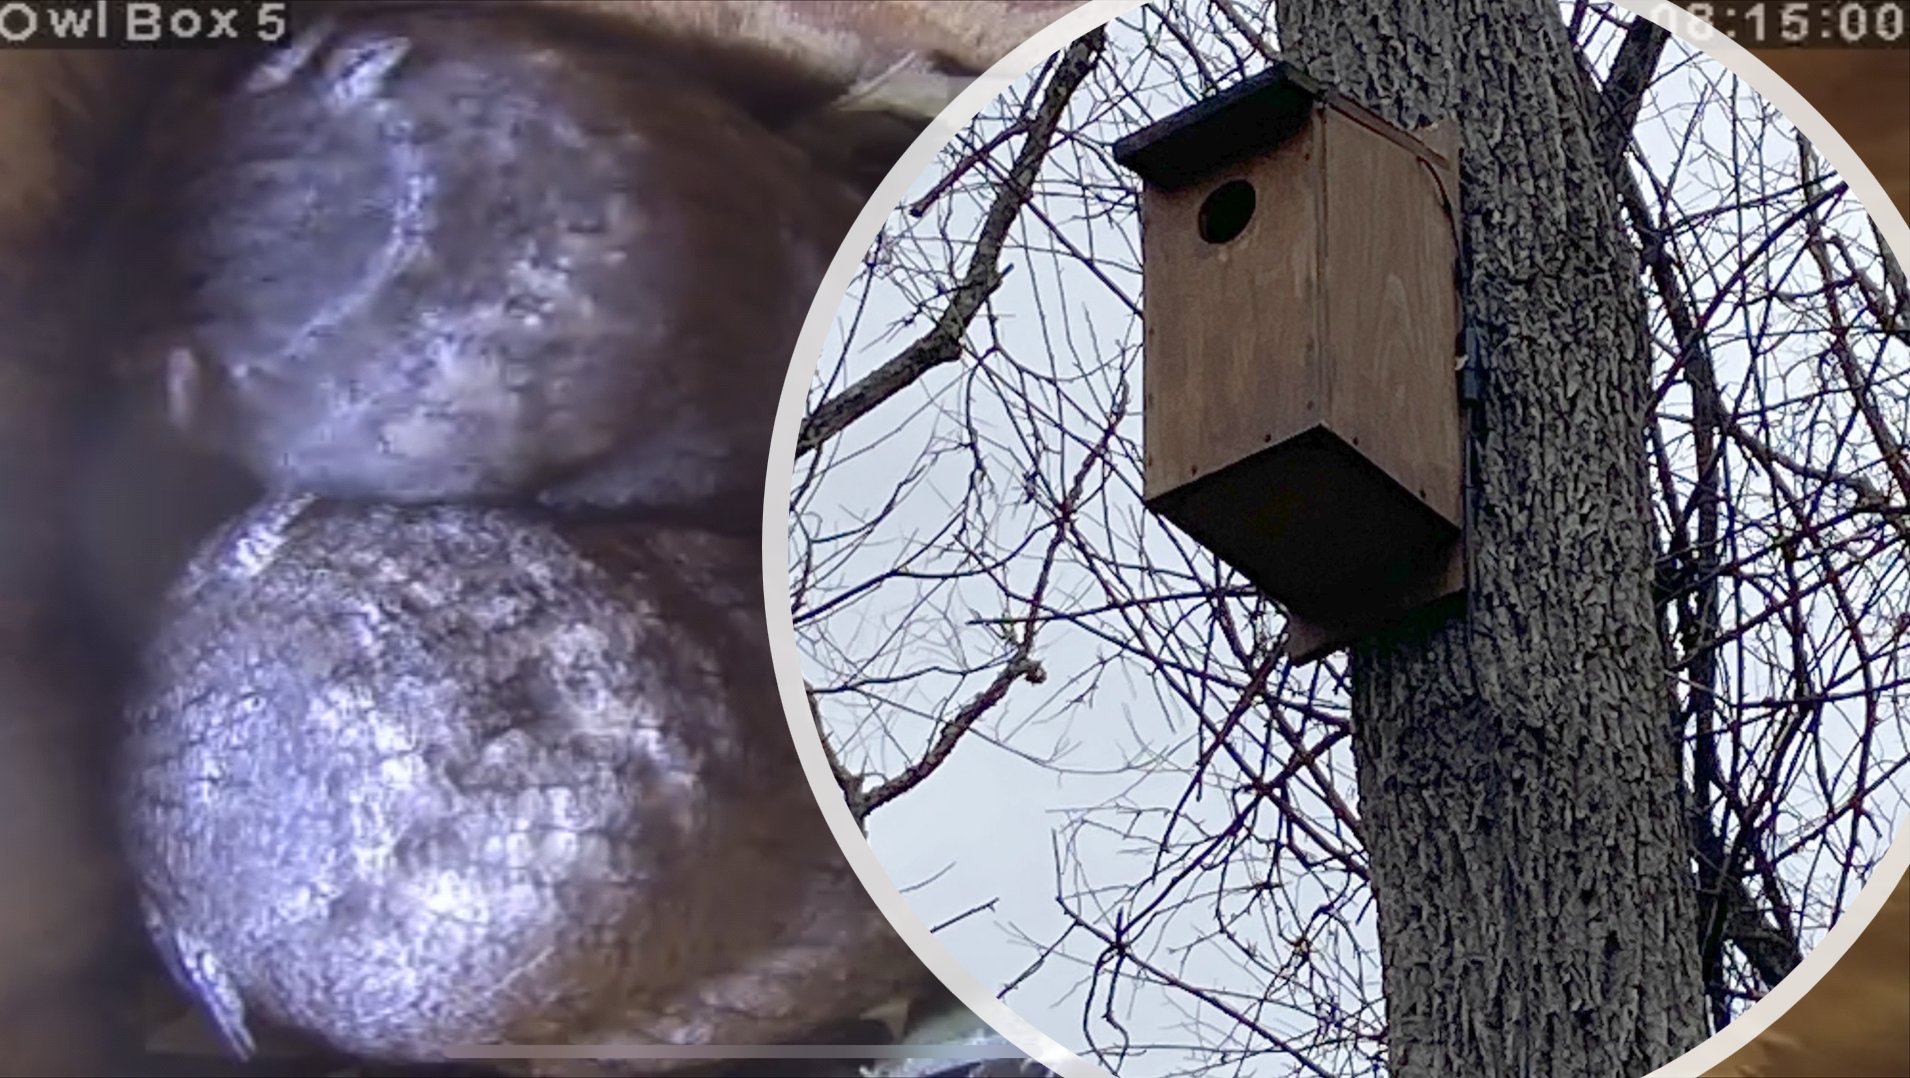
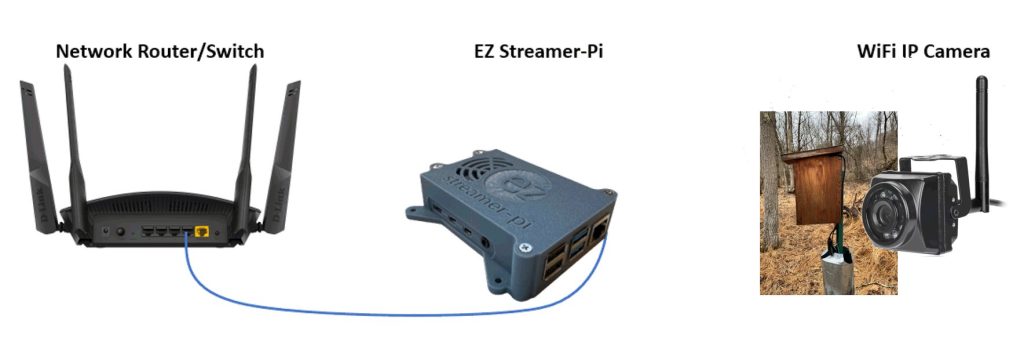
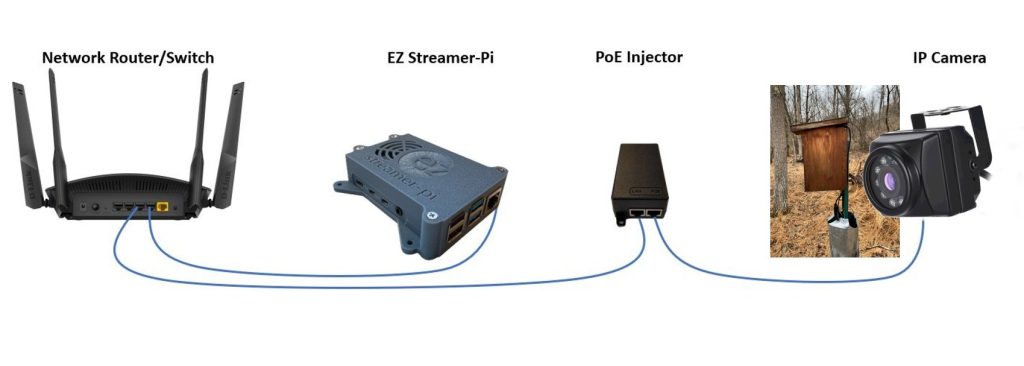
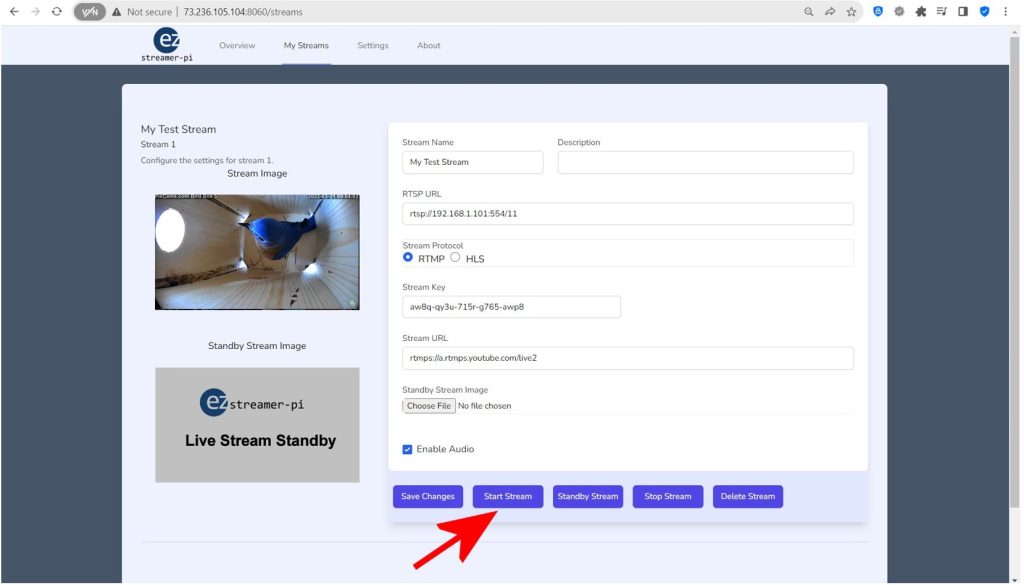
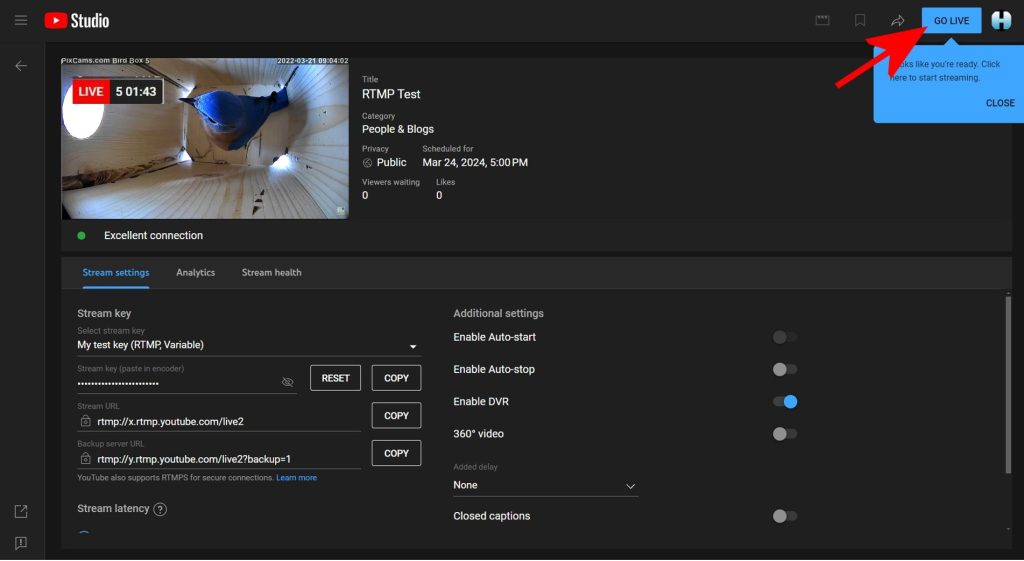
One of the most exciting aspects of installing an owl box is the ability to observe and share the activity inside it. By adding a live streaming camera, you can watch owls roost, nest, and raise their young without disturbing them. To live stream your owl box to YouTube, you can use our EZ Streamer-Pi, a free software solution designed for the Raspberry Pi single-board computer. This software allows you to stream up to four IP or security cameras simultaneously to platforms like YouTube, making it perfect for wildlife observation.

Installing a camera inside or just outside the owl box requires careful consideration. A small infrared (IR) camera works best, as it provides clear video in low light without disturbing the owls. The camera should be placed in a way that does not interfere with the owl’s entry and exit while still capturing a full view of the nesting chamber. With EZ Streamer-Pi, you can set up a seamless live feed, allowing you and others to watch the owls in real-time, whether they are settling in for a winter roost or raising their chicks in the spring.

By following this guide, you can create a perfect home for screech owls while also setting up a unique window into their world through live streaming.

What You Need To Build The Nest Box

  1. 1 x 10 x 8′ Pine Lumber –
  2. Box of #8 x 1 1/2″ outdoor rated wood screws
  3. Roofing Material

Cutting the Wood for Your Owl Box

Owl1
Owl2

Cut the Right Side, Left Side, Front, and Front as shown above from the 1 x 10 lumber. We use pine lumber for this project but feel free to use your favorite type of wood for you nest box. 

Owl3

Cut the top from a 1 x 12 piece of lumber and the back from a 1 x 10 piece of lumber. Note, feel free to use 1 x 10 lumber for the top. We use a larger top to keep the rain off the box better and keep it cooler.

Drilling Pilot Holes and Assembling the Nest Box

Owl4

Drill pilot holes for the #8 – 1 1/2″ wood screws for box assembly. Use 1 5/32″ bit for drilling all pilot holes for this project. Attach the Front to the Right and Left Sides as shown above.

Owl5
Owl6

Attach the Back to the Right and Left Sides as shown above.

Owl7
Owl8

Attach the Roof with hinges to the Back as shown above.

Owl9

Having top access to the owl box makes for easy cleaning between owl seasons.

Owl10
Owl11

Add a Hook & Eye to keep the roof locked so predators can’t open the box.

Owl12

Your owl box is complete!

How To Install A Camera

Note: this section is optional. If you wish to install a live streaming camera in your nest box this is one that we recommend. This camera is an IP type camera that will connect to your home network. These cameras can be used 24/7 to watch your nest box and can be live streamed to YouTube using the PixCams EZ Streamer-Pi encoder.

BB19

Camera Recommendations 

Shown above is the type of camera we recommend using. These are what are known at PoE (Power Over Ethernet) cameras. This means the camera is powered and connected to your home network through a single Ethernet cable. These are some locations you can purchase this camera:

Outdoor Mini IP PoE Camera: AliExpress Link: https://www.aliexpress.us/item/3256802313659249.html, Price $36.11

Camera Installation

BB20

If you plan to install a camera of this type in your nest box you will need to cut a notch in the top corner of the Right Side to allow the camera cable to be fed out of the box as shown above. 

BB21

For mounting the camera in the nest box we recommend using a 3/4″ long wood screw as shown above.

BB22

To easily mount the camera to the inside of the roof it might be easier to remove the roof and attach the camera as shown above.

BB23

Above shows the IP camera mounted in the nest box.

BB24

Add a cable clamp to hold the camera cable in place as show above.

BB25

Camera installation is complete.


Adding Waterproofing To Your Nest Box

These are some steps we recommend when using pine lumber to keep your nest box in the field longer. Some people like to keep the nest box natural, but our experience has shown pine boxes that do not have a protective stain only last about 5 years in the outdoors.

BB26

Above the nest box is coated with a waterproof stain the keep the pine lumber protected in the outdoors.

BB27

We highly recommend using a roofing product to protect the top of the nest box. Above we are using a Peel & Stick Roofing Starter.

BB28

Cut the roofing piece the to fit the roof.

BB29

Peel and Stick the roofing piece into place as shown above.

BB30

Your nest box is complete!


How To Live Stream Your Nest Box Camera To YouTube

EZStreamerPi-LiveStream-BirdBox

If you’ve set up a nest box camera and want to share the incredible moments of nesting birds with the world, the PixCams EZ Streamer-Pi makes live streaming easier than ever. This powerful yet user-friendly software runs on a Raspberry Pi and allows you to stream up to four IP or security cameras directly to YouTube or other platforms. With EZ Streamer-Pi, you can broadcast high-quality live footage of bird activity in real time, whether it’s a chick hatching or a parent feeding its young. Setting up is simple—just follow the EZ Streamer-Pi guide to install the software, configure your camera settings, and go live! Plus, you can check out real-world EZ Streamer-Pi live configurations to see how others are using it for their wildlife streams. Whether you’re a birdwatcher, researcher, or nature enthusiast, EZ Streamer-Pi brings the beauty of nature to viewers worldwide.

About EZ Streamer-Pi

EZ Streamer-Pi is a dedicated live streaming video encoder designed by PixCams, Inc. Our FREE EZ Streamer-Pi Softwareto create your own live stream! The EZ Streamer-Pi works with most Security/IP Cameras and will live stream to services like YouTube, Facebook LIVE, and Twitch. We also have read-built units you can purchase.

Connecting Your Camera and EZ Streamer-Pi To Your Home Network

The EZ Streamer-Pi is compatible with IP Cameras (Internet Protocol Cameras) that support H.264 and H.265 encoding and include the Real-Time Streaming Protocol (RTSP). IP cameras use either Ethernet cables or a Wi-Fi connection to connect to your local network. From there, the signal will be encoded by the EZ Streamer encoder to your live streaming service.

Below are several different diagrams of how IP cameras can be connected to a network to be live streamed. The EZ Streamer can stream any combination of the configurations shown.

Configuration 1

This is one of the most basic set ups using the EZ Streamer-Pi and a security/IP Camera to live stream your webcam to YouTube and/or Facebook Live. Simply connect the EZ Streamer to your router or a network switch on your network. Next, run an outdoor rated CAT6 Ethernet cable from your router or switch to the IP camera. You will also need to power the IP camera using this configuration. The Ethernet cable can’t be any longer than 300′. Once the systems are wired configure then set up a live stream on your EZ-Streamer unit and you’re live!

Configuration 2

This is second most basic set up’s using the EZ Streamer-Pi and a WiFi security/IP Camera to live stream your webcam to YouTube and/or Facebook Live. First, connect the EZ Streamer to your WiFi router or network switch. Next, install our WiFi IP camera within wireless range of your WiFi router and plug the AC power outlet into your camera. Once the systems is wired configure your EZ Streamer-Pi then set up a live stream on your EZ-Streamer unit and you’re live!

Configuration 3

Configuration 3 demonstrates the use of a PoE injector. If your IP camera supports PoE (Power over Ethernet) you can use a PoE extender to extend the wired range of your IP camera up to 100 meters/300 feet from the network router/switch. Using a PoE injector means that both network communications and power are run over the ethernet cable that will also power the IP camera which eliminates the need to power the IP camera. This configuration is useful for IP cameras mounted outdoors

Configure The EZ Streamer-Pi To Live Stream To YouTube

EZ Streamer-Pi is a dedicated RTSP live streaming encoder using a Raspberry Pi single board computer. Connect any IP camera with H.264 or H.265 compression and supports RTSP protocol (Real-Time Messaging Protocol). Stream to any streaming player service supporting RTMP (Real-Time Messaging Protocol) such as YouTube, Facebook Live, and Twitch.

Enter a name and a description of your new live stream. Next, enter the stream URL into the “RTSP URL” box of your IP camera. This will start with “rtsp://”. The format of the RTSP link is typically provided by the IP Camera manufacturer. You can also visit https://www.ispyconnect.com/cameras for help finding the RTSP link of your IP camera.

Example Camera RTSP Link Format
This is a common format for the RTSP Stream URL, but each camera typically has its own format:

  rtsp://username:password@IP Address:RTSP Port/stream0

Example of a camera with the IP address of 10.1.10.133 on RTSP Port 554 with the username “admin” and password “mycampassword”:

  rtsp://admin: mycampassword @10.1.10.133:554/stream0

NOTE: In the camera settings please set the streaming protocol to H.264, enable the audio, and set the bitrate lower than 4,000 bits/second. Be sure to set a static IP address for each camera so this will be consistent for the RTSP link of your EZ Streamer-Pi. If you plan to use H.265 format then you will need to stream to YouTube’s HLS player.

Start The YouTube Live Stream

First, go to your YouTube channel. If you do not have a YouTube account, you will need to create one first. After you log into your YouTube channel press the “Customize channel” button. Next, press the “CREATE” button. Select the “Go Live” option. Next, press the “SCHEDULE STREAM” button. Enter the Stream Details of the Title and Description, once complete press the “NEXT” button. Enter the Stream Customization details and press the “NEXT” button when complete. Once complete you need to copy the “Stream Key” and “Stream URL” and past those into your EZ Streamer-Pi Stream Key and Stream URL. Go back to your YouTube page and you should see the stream appear. This can take several minutes. Once the stream is established the “GO LIVE” button will turn blue. When this happens press that button.

Congratulations! You have successfully started your first YouTube Live Stream! If you go to the “Overview” button on your EZ Streamer-Pi browser page you will see a display showing the frame rate (FPS) and bitrate of your live stream. this data will be graphed ever one-minute on the graphs below to monitor the stream health of your live stream.

Connect with us!

5 1 vote
Article Rating
Subscribe
Notify of
guest
0 Comments
Oldest
Newest Most Voted
Inline Feedbacks
View all comments