Download the EZ Streamer-Pi IMAGE from our download section and save it on your computer. Next, download and install the balenEtcher software application to write the EZ Streamer-Pi IMAGE to your Micro SD Card. Follow this link to download balenEtcher, https://etcher.balena.io/. Etcher works on Microsoft Windows 10 and later, Linux (most distros) and macOS 10.10 (Yosemite) and later. Make sure you download the correct version from our downloads section.
After balenEtcher is installed run the application and select “Flash from file”
Navigate to where you downloaded the “ezstreamer_VX_Y_Z” file and select that file.
Select the Mass Storage Deice USB Device drive location of your Micro USB drive.
Next, press the “Flash!” button to start writing the EZ Streamer-Pi image to the Micro USB drive.
Step 2
Once balenEtcher has completed the flashing of the EZ Streamer-Pi image remove the Micro USB drive from your computer and insert it into your Raspberry Pi and power up the Raspberry Pi.
Step 3
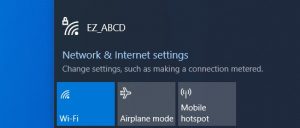
Once the Raspberry Pi is powered up go to your computer and select the WiFi icon and search for a WiFi access point named “EZ_ABCD”
Select the “EZ_ABCD” access point and type in the security key of “1234567890” and press “Next” to connect to that access point”
Once you connect to that “EZ_ABCD” access point a browser window should automatically load with a login screen to the EZ Streamer-Pi software. If the browser page does not load bring up your browser and put in this address: 10.42.0.1
Next, click on the “Login” button.
At the login screen type in “ABCD” for the username and “1234567890” for the password.
Once logged in you will come to this screen. Select the “Settings” link at the top.
The first thing you need to do is change the “Login Username” from the default “ABCD” to a new username. Note the IP address of the EZ Streamer-Pi unit and bookmark that address. You will continue to use this IP address to access the EZ Streamer-Pi unit.
After you have changed the name. In this example we changed the new login name to “MyEZStreamer” and press the “SAVE” button.
Once you press save you will need to enter the default password of “1234567890” and press “UPDATE”. At this point the Raspberry Pi will reboot and change the name of the WiFi access point to your username you selected.
After the Raspberry Pi has rebooted the login screen will come up for the EZ Streamer-Pi unit.
Login to the EZ Streamer-Pi unit with your new username and default password of 1234567890″.
Once logged in navigate to the “Settings” tab again and chance the password from the default password to a new password.
Installation Complete! Once you have completed the installation step you can access the EZ Streamer-Pi software from the IP address or select the Access Point. The new name of the EZ Streamer-Pi Access Point will be “EZ_name”.